:::info Last tested Kali Linux 2025.4 · HexStrike AI (Kali package 2025.4 repo) · May 2026. Results may vary on other versions. :::
Building an Extremely Vulnerable Ubuntu 24.04 Server Lab (Bonus: Full PT with Hexstrike)
A Step-by-Step Guide: Hands-on guide to creating an intentionally insecure Ubuntu 24.04.3 Server VM with open SSH, FTP, Samba, NFS…
Building an Extremely Vulnerable Ubuntu 24.04 Server Lab (Bonus: Full PT with Hexstrike)
A Step-by-Step Guide: Hands-on guide to creating an intentionally insecure Ubuntu 24.04.3 Server VM with open SSH, FTP, Samba, NFS, Apache/PHP, MariaDB, privilege escalation vectors, vulnerable web apps, and sensitive data leaks

This guide will walk you through creating a vulnerable Ubuntu 24.04.3 Server virtual machine (VM) lab for ethical penetration testing, security research, or educational purposes. Important Safety Note: This setup intentionally introduces severe security flaws, making the system highly exploitable. Only run this in an isolated virtual environment (e.g., a VM on your local machine). Do not deploy this on production systems, public networks, or without explicit permission. Always comply with laws and ethical guidelines — use for authorized testing only (e.g., CTFs, bug bounties, or personal labs). The vulnerabilities introduced here are based on common real-world exploits but are amplified for demonstration.
We’ll use VirtualBox or VMware as the hypervisor, download a legitimate Ubuntu Server 24.04.3 ISO, install Ubuntu, and then apply an enhanced bash script to introduce vulnerabilities. The script disables defenses, opens services, creates weak accounts, sets up privilege escalation paths, installs vulnerable software (including a backdoored vsftpd, DVWA, phpMyAdmin), adds dummy sensitive data, and more.
HexStrike on Kali Linux 2025.4: A Comprehensive Guide
HexStrike AI is an AI-powered offensive security framework that merges multi-agent AI with 150+ professional pentesting… medium.com
Building an Extremely Vulnerable Windows 10 Lab: A Step-by-Step Guide (Bonus:Full PT with…
Hands-on guide to creating an intentionally insecure Windows 10 VM with open SSH, SMB, RDP, FTP, privilege escalation… medium.com
Prerequisites
- A host machine with at least 8GB RAM, 4 CPU cores, and 50GB free storage (recommended for smooth VM performance).
- Internet access for downloads.
- Virtualization enabled in your BIOS/UEFI (VT-x for Intel or AMD-V for AMD).
VirtualBox (Recommended for Beginners — Free and Open-Source)
Download and install VirtualBox (latest version from <https://www.virtualbox.org/ >).
- On Ubuntu/Kali Linux: sudo apt update && sudo apt install virtualbox virtualbox-ext-pack
- On Windows/macOS: Download the installer from the official site and run it.
- Why VirtualBox? Completely free, simple interface, excellent for pentesting labs.
VMware Alternative (VMware Workstation Player — Free for Personal Use, Better Performance) As of 2025–2026, VMware Workstation Player/Pro is free for personal/non-commercial use.
Download from <https://www.vmware.com/products/workstation-player.html >.
- On Ubuntu/Kali: Download .bundle, chmod +x VMware-.bundle, install prerequisites (sudo apt install build-essential linux-headers-$(uname -r)), run sudo ./VMware-.bundle.
- Why VMware? Better performance for complex labs.
Step 1: Download the Ubuntu 24.04.3 Server ISO
- Go to the official Ubuntu download page: <https://ubuntu.com/download/server>.
- Select Ubuntu 24.04.3 LTS Server (AMD64). Download the ISO (~2GB).
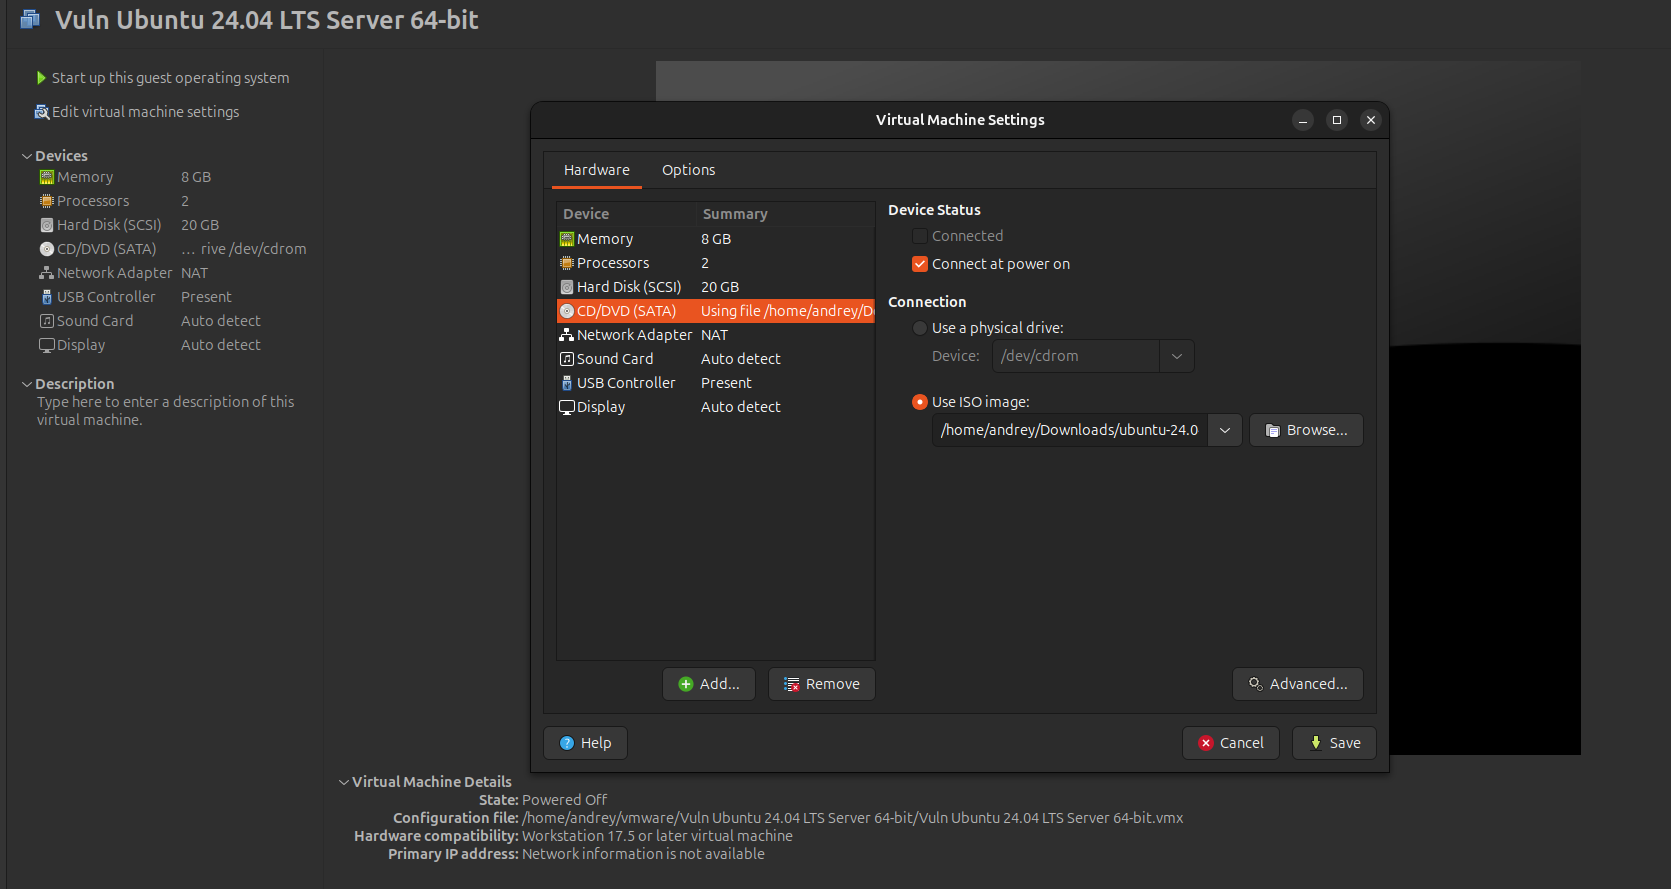
Step 2: Create a New Virtual Machine In VirtualBox:
- Open VirtualBox, click “New”. Name: “VulnUbuntuLab”. Type: Linux, Version: Ubuntu (64-bit).
- Allocate: Memory 2GB (min), CPU 2 cores, Hard Disk 40GB (VDI, dynamic).
- Settings: Storage > Add ISO to optical drive; Network > NAT or Bridged for lab.
- Start the VM.
In VMware:
- File > New VM > Typical > ISO path. Guest OS: Linux > Ubuntu 64-bit.
- Disk: 40GB single file. Customize: Memory 2GB, CPU 2 cores, Network NAT/Bridged.
- Finish and power on.
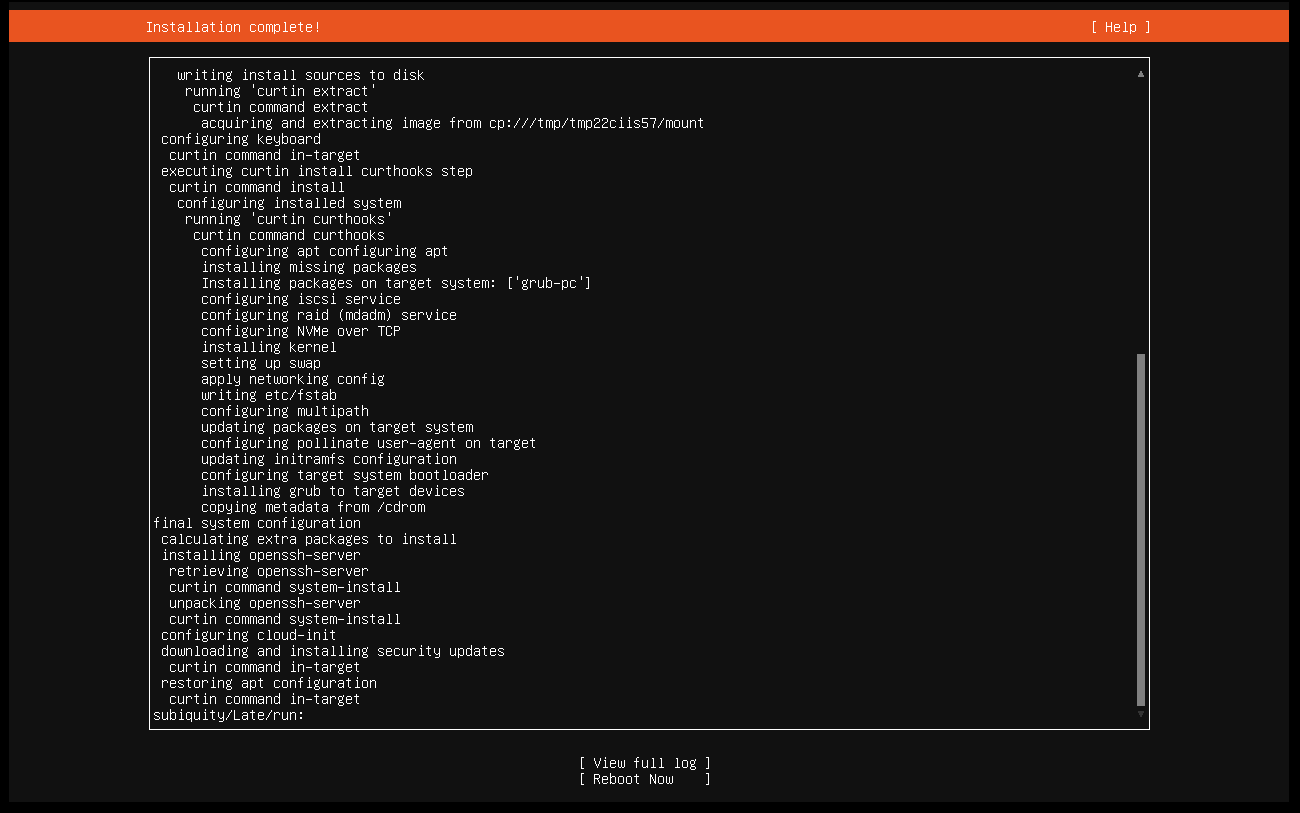
Step 3: Install Ubuntu 24.04.3 Server
-
Boot from ISO, select language (English), install Ubuntu Server.
-
Network: Use DHCP (or static for lab).
-
Storage: Use entire disk.
-
Profile: Set hostname “vulnubuntu”, username “admin”, password “password” (weaken later).
-
SSH: Enable OpenSSH server.
-
Featured Server Snaps: None (install manually).
-
Install takes 10–20 minutes. Reboot, login as admin.
-
Update basics:
sudo apt update && sudo apt upgrade -y (but avoid security patches for vuln lab).
9. Install Guest Additions/Tools:
-
For VirtualBox:
sudo apt install linux-headers-$(uname -r) build-essential dkms
Insert Guest Additions CD, run installer.
-
For VMware:
sudo apt install -y open-vm-tools open-vm-tools-desktop
sudo reboot
Step 4: Configure Basic Networking and Access
- Ensure internet: ping google.com.
- For lab: Note IP (ip addr show), switch to Bridged for Kali access.
- Enable SSH: Already installed, but ensure password auth:
sudo sed -i 's/#PasswordAuthentication yes/PasswordAuthentication yes/' /etc/ssh/sshd_config && sudo systemctl restart ssh
TAKE CLEAR SNAPSHOT!!!
If this is a server-only (CLI) VM
Copy/paste between host ↔ VM will not work in the VMware console.
Recommended alternatives:
-
SSH from host
ssh -l
-
→ Copy/paste works perfectly in your terminal
-
scp / rsync
scp file.txt user@vm-ip:/path/
-
Install a lightweight GUI (optional) :
sudo apt install ubuntu-desktop-minimal
Step 5: Introduce Vulnerabilities Using Bash Script
-
Login as root (with sudo).
-
Copy and paste the enhanced vulnerable lab creator script (provided below) into a file:
sudo nano /tmp/vuln-setup.sh
Bash Script:
 #!/bin/bash

# ==============================================================================
# ULTIMATE VULNERABLE UBUNTU 24.04 SERVER LAB SETUP - FULLY FIXED VERSION
# Run once with: sudo bash /tmp/vuln-setup.sh
# ==============================================================================

set -e  # Stop on any error

echo "=== EXTREME VULNERABLE LAB SETUP STARTED ==="

# 1. Disable defenses
ufw disable
systemctl stop apparmor || true
systemctl disable apparmor || true
echo 0 > /proc/sys/kernel/randomize_va_space
echo "kernel.randomize_va_space = 0" >> /etc/sysctl.conf
sysctl -p

# 2. Install everything
apt update -y
apt install -y \
    openssh-server apache2 libapache2-mod-php php php-mysql mariadb-server \
    samba nfs-kernel-server inetutils-telnetd git build-essential \
    phpmyadmin vsftpd

# 3. Configure services

# SSH password auth
sed -i 's/#PasswordAuthentication yes/PasswordAuthentication yes/' /etc/ssh/sshd_config
sed -i 's/PasswordAuthentication no/PasswordAuthentication yes/' /etc/ssh/sshd_config
systemctl restart ssh

# Apache + PHP world-writable
a2enmod rewrite
chmod 777 /var/www/html
systemctl restart apache2

# Samba - guest writable shares including root
mkdir -p /var/smb/public /var/smb/secrets
chmod 777 /var/smb/public /var/smb/secrets
cat >> /etc/samba/smb.conf <<EOF

[public]
   path = /var/smb/public
   writable = yes
   guest ok = yes

[secrets]
   path = /var/smb/secrets
   writable = yes
   guest ok = yes

[root]
   path = /
   writable = yes
   guest ok = yes
EOF
systemctl restart smbd

# NFS - extreme no_root_squash
cat > /etc/exports <<EOF
/ *(rw,sync,no_root_squash,insecure,no_subtree_check)
/home *(rw,sync,no_root_squash,insecure,no_subtree_check)
EOF
exportfs -ra
systemctl restart nfs-kernel-server

# Telnet via inetd (correct way on Ubuntu)
echo "telnet stream tcp nowait root /usr/sbin/in.telnetd in.telnetd" >> /etc/inetd.conf
systemctl restart inetutils-inetd

# vsftpd - fully anonymous + upload
cat > /etc/vsftpd.conf <<EOF
listen=YES
anonymous_enable=YES
local_enable=YES
write_enable=YES
anon_upload_enable=YES
anon_mkdir_write_enable=YES
anon_root=/var/ftp/pub
chroot_local_user=YES
allow_writeable_chroot=YES
EOF
mkdir -p /var/ftp/pub
chmod 777 /var/ftp/pub
systemctl restart vsftpd

# 4. MariaDB - completely open
mysql <<EOF
ALTER USER 'root'@'localhost' IDENTIFIED BY 'password';
CREATE USER IF NOT EXISTS 'root'@'%' IDENTIFIED BY 'password';
GRANT ALL PRIVILEGES ON *.* TO 'root'@'%' WITH GRANT OPTION;
CREATE USER IF NOT EXISTS ''@'%';
GRANT ALL PRIVILEGES ON *.* TO ''@'%' WITH GRANT OPTION;
CREATE USER IF NOT EXISTS 'admin'@'%' IDENTIFIED BY 'password123';
GRANT ALL PRIVILEGES ON *.* TO 'admin'@'%' WITH GRANT OPTION;
FLUSH PRIVILEGES;
EOF

echo "bind-address = 0.0.0.0" >> /etc/mysql/mariadb.conf.d/50-server.cnf
systemctl restart mariadb

# 5. DVWA + phpMyAdmin
git clone https://github.com/digininja/DVWA.git /var/www/html/DVWA
cp /var/www/html/DVWA/config/config.inc.php.dist /var/www/html/DVWA/config/config.inc.php
sed -i "s/p@ssw0rd/password123/" /var/www/html/DVWA/config/config.inc.php
sed -i "s/'root'/'admin'/" /var/www/html/DVWA/config/config.inc.php
mysql -u root -ppassword <<EOF
CREATE DATABASE IF NOT EXISTS dvwa;
GRANT ALL ON dvwa.* TO 'admin'@'%' IDENTIFIED BY 'password123';
FLUSH PRIVILEGES;
EOF
chown -R www-data:www-data /var/www/html/DVWA
chmod -R 755 /var/www/html/DVWA
ln -sf /usr/share/phpmyadmin /var/www/html/phpmyadmin

# 6. Weak users + privilege escalation
useradd -m -s /bin/bash -p '$(openssl passwd -1 password123)' guest_user
useradd -m -s /bin/bash -p '$(openssl passwd -1 123456)' ftp_user
useradd -m -s /bin/bash -p '$(openssl passwd -1 password123)' web_admin
useradd -m -s /bin/bash -p '$(openssl passwd -1 C0mplex_77!_HArd_To_Gu3ss)' it_admin

echo "ftp_user ALL=(ALL) NOPASSWD: ALL" >> /etc/sudoers
echo "guest_user ALL=(ALL) NOPASSWD: /bin/bash" >> /etc/sudoers

# Setuid root shell
mkdir -p /opt/vuln
cat > /opt/vuln/vuln.c <<'EOF'
#include <unistd.h>
int main() {
    setuid(0); setgid(0);
    execl("/bin/bash", "bash", NULL);
    return 0;
}
EOF
gcc /opt/vuln/vuln.c -o /usr/local/bin/vuln-shell
chmod 4755 /usr/local/bin/vuln-shell

# 7. Sensitive data
mkdir -p /secrets /database
cat > /secrets/passwords.txt <<EOF
it_admin:C0mplex_77!_HArd_To_Gu3ss
ftp_user:123456
web_admin:password123
guest_user:password123
root:password
EOF
cat > /secrets/credit_cards.csv <<EOF
Name,CardNumber,Expiry
John Doe,4444-5555-6666-7777,12/28
Jane Smith,8888-9999-0000-1111,05/30
EOF
chmod -R 777 /secrets /database /var/ftp/pub

echo "=== SETUP COMPLETE ==="
echo "REBOOT NOW: sudo reboot"
echo "After reboot, run the verification script below."
3. Make executable:
sudo chmod +x /tmp/vuln-setup.sh
4. Run:
sudo /tmp/vuln-setup.sh
Reboot the system:
reboot
Post-Reboot Verification Script:
nano /tmp/post_reboot.sh
Script:
#!/bin/bash
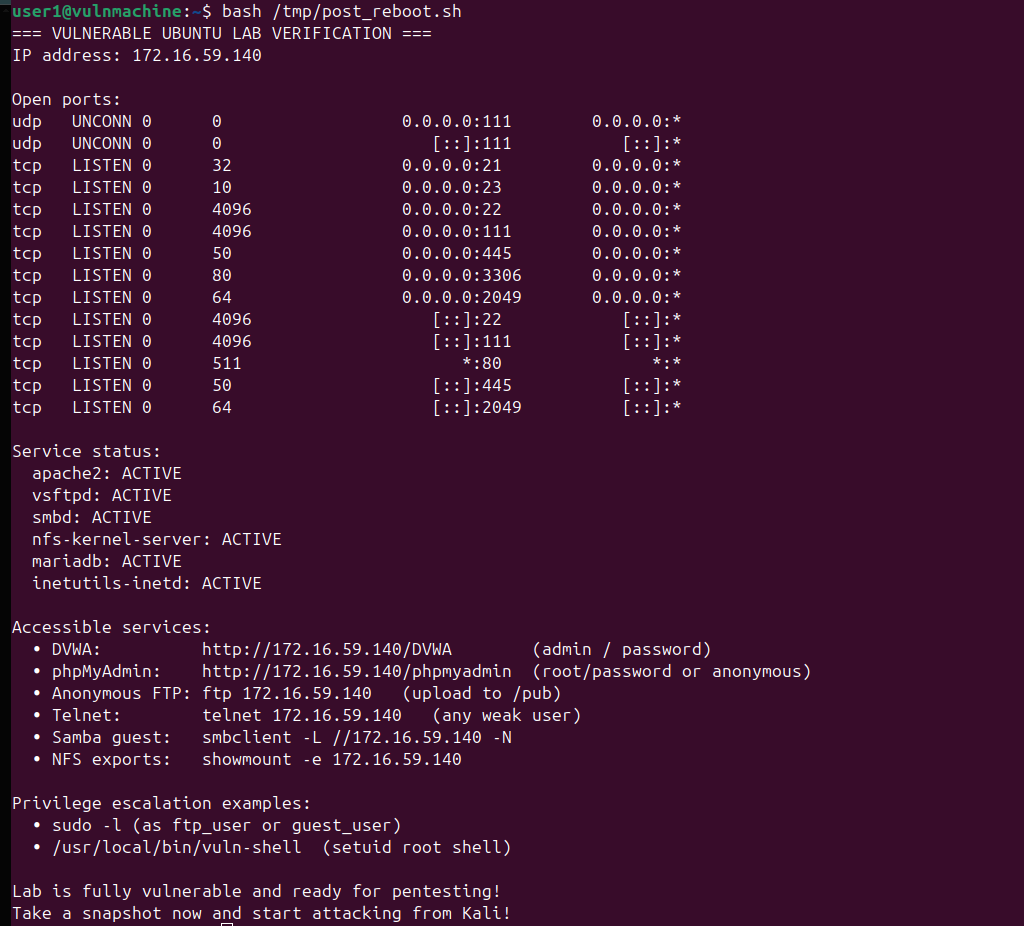
echo "=== VULNERABLE UBUNTU LAB VERIFICATION ==="
IP=$(hostname -I | awk '{print $1}')
echo "IP address: $IP"
echo
echo "Open ports:"
ss -tuln | grep -E '21|22|23|80|111|445|2049|3306'
echo
echo "Service status:"
for s in apache2 vsftpd smbd nfs-kernel-server mariadb inetutils-inetd; do
systemctl is-active $s >/dev/null && echo " $s: ACTIVE" || echo " $s: INACTIVE"
done
echo
echo "Accessible services:"
echo " • DVWA: http://$IP/DVWA (admin / password)"
echo " • phpMyAdmin: http://$IP/phpmyadmin (root/password or anonymous)"
echo " • Anonymous FTP: ftp $IP (upload to /pub)"
echo " • Telnet: telnet $IP (any weak user)"
echo " • Samba guest: smbclient -L //$IP -N"
echo " • NFS exports: showmount -e $IP"
echo
echo "Privilege escalation examples:"
echo " • sudo -l (as ftp_user or guest_user)"
echo " • /usr/local/bin/vuln-shell (setuid root shell)"
echo
echo "Lab is fully vulnerable and ready for pentesting!"
echo "Take a snapshot now and start attacking from Kali!"
sudo chmod +x /tmp/post_reboot.sh
sudo /tmp/post_reboot.sh
TAKE NEW SNAPSHOT!
Quick Testing the Lab
- Scan with nmap: Open ports 21 (FTP), 22 (SSH), 23 (Telnet), 80 (HTTP), 445 (SMB), 2049 (NFS), 3306 (MySQL), 873 (Rsync).
- Brute-force SSH/FTP/Telnet with weak creds (Hydra).
- Mount open SMB/NFS shares anonymously.
- Exploit DVWA (SQLi, XSS, etc.).
- Priv esc: Sudo abuse, setuid exec, writable cron.
- phpMyAdmin: Login admin/password123.
Explanation of Introduced Vulnerabilities The script creates a highly exploitable Ubuntu environment for educational pentesting. Below is a breakdown:
- Disabled Defenses : Firewall off, AppArmor/ASLR disabled. Exploit: Unrestricted traffic, predictable memory for overflows.
- Open Services :
- SSH/Telnet: Password auth, weak users. Exploit: Brute-force (Hydra).
- FTP (vsftpd 2.3.4 backdoored): Anonymous access. Exploit: Metasploit vsftpd_backdoor.
- Samba: Guest-writable shares. Exploit: Anonymous data theft/upload.
- NFS: no_root_squash. Exploit: Remote root via mounted exports.
- Apache/PHP: World-writable webroot. Exploit: Upload webshells.
- MariaDB/phpMyAdmin: Weak creds. Exploit: Remote DB access/dumps.
- Rsync: Root access to /. Exploit: Modify system files remotely.
3. Weak Identities : Users with simple passwords, no expiration. Exploit: Credential stuffing.
4. Privilege Escalation : Sudo NOPASSWD, setuid binary (exec), writable cron/root script, vulnerable service. Exploit: Escalate to root via vi/sh/nmap abuse, command injection.
5. Dummy Data : Exposed passwords, CC info, SQL dumps. Exploit: Theft via shares/services.
6. Vulnerable Apps : DVWA for web vulns (SQLi, CSRF, etc.).
Basic Penetration Test Report for this Lab
**This PT was performed with HexStrike-AI + Gemini-CLI in one prompt
** * HexStrike on Kali Linux 2025.4: A Comprehensive Guide here
 ## 1. Executive Summary

A penetration test was conducted on the target machine 172.16.59.140, identified as a Kali GNU/Linux Rolling system (Version 2025.4). Multiple critical vulnerabilities were identified, leading to full administrative control (root access) over the system. The primary vulnerability exploited was a misconfigured Network File System (NFS) share, which allowed unauthorized access to the target's root filesystem. Additionally, sensitive credentials were discovered, including a root password and other user credentials.

## 2. Methodology

The penetration test followed a standard methodology:
*   **Reconnaissance:** Initial port scanning and service enumeration.
*   **Vulnerability Identification:** Analysis of open services and identified misconfigurations.
*   **Exploitation:** Leveraging identified vulnerabilities to gain unauthorized access.
*   **Post-Exploitation:** Gathering system information, sensitive data, and confirming root access.
*   **Reporting:** Documenting findings and recommendations.

## 3. Reconnaissance - Open Ports and Protocols

The following open ports and services were identified on the target machine (172.16.59.140) during the reconnaissance phase using `autorecon` and `nmap`:

| Port/Protocol | Service       | Version                               |
|---------------|---------------|---------------------------------------|
| 21/tcp        | FTP           | vsftpd 3.0.5                          |
| 22/tcp        | SSH           | OpenSSH 9.6p1 Ubuntu 3ubuntu13.14     |
| 23/tcp        | Telnet        | tcpwrapped                            |
| 80/tcp        | HTTP          | Apache httpd 2.4.58 (Ubuntu)          |
| 111/tcp,udp   | RPC           | rpcbind 2-4                           |
| 139/tcp       | NetBIOS       | Samba smbd 4                          |
| 445/tcp       | NetBIOS       | Samba smbd 4                          |
| 2049/tcp      | NFS           | nfs_acl 3                             |
| 3306/tcp      | MySQL         | MariaDB 5.5.5-10.11.13                |
| 32857/tcp     | mountd        | 1-3 (RPC #100005)                     |
| 35029/tcp     | status        | 1 (RPC #100024)                       |
| 36399/tcp     | mountd        | 1-3 (RPC #100005)                     |
| 42753/tcp     | nlockmgr      | 1-4 (RPC #100021)                     |
| 54907/tcp     | mountd        | 1-3 (RPC #100005)                     |
| 137/udp       | NetBIOS       |                                       |

## 4. Vulnerabilities and Exploits

### 4.1. Critical: Misconfigured NFS Shares (Root Access)
*   **Description:** The target machine was found to be exporting its entire root filesystem (`/`) and `/home` directory via NFS to all clients (`*`). This misconfiguration allowed the attacker to mount the target's filesystem locally with root privileges.
*   **Exploit:** The attacker mounted the `/` and `/home` directories locally using `mount -t nfs 172.16.59.140:/ /tmp/nfs_root` and `mount -t nfs 172.16.59.140:/home /tmp/nfs_home`. This provided direct read/write access to the entire filesystem.
*   **Impact:** Complete compromise of the target system, including reading, writing, and executing arbitrary files as root. This directly led to gaining a root shell.
*   **Proof:**
    *   `showmount -e 172.16.59.140` revealed `/` and `/home` exported to `*`.
    *   Successful mounting of `/` to `/tmp/nfs_root` and `/home` to `/tmp/nfs_home`.
    *   Successful execution of `id` command on the target machine via a reverse shell, confirming `uid=0(root) gid=0(root) groups=0(root)`.

### 4.2. Critical: Exposed Credentials (passwords.txt)
*   **Description:** A file named `passwords.txt` was discovered in a non-standard, world-readable directory `/secrets` on the target machine. This file contained plaintext credentials for several users, including `root`.
*   **Exploit:** The credentials were directly read from the mounted NFS share.
*   **Impact:** Direct access to user accounts, including the administrative `root` account, enabling further system compromise and lateral movement.
*   **Proof:**
    *   Contents of `/tmp/nfs_root/secrets/passwords.txt`:
        ```
        it_admin:C0mplex_77!_HArd_To_Gu3ss
        ftp_user:123456
        web_admin:password123
        guest_user:password123
        root:password
        ```

### 4.3. High: phpMyAdmin Access with Root Credentials
*   **Description:** The phpMyAdmin web interface was accessible on port 80, and the discovered `root:password` credentials allowed successful login.
*   **Exploit:** The `root:password` credentials were used to log into the phpMyAdmin interface. This allowed for arbitrary SQL query execution, including `SELECT INTO OUTFILE` to write files to the web server's document root.
*   **Impact:** Full administrative control over the MySQL database, including data manipulation, schema modification, and potential for further system compromise through SQL injection or file write vulnerabilities.
*   **Proof:**
    *   Successful login to phpMyAdmin using `root:password`.
    *   Successful upload and execution of `test.php` via `SELECT INTO OUTFILE` to `/var/www/html/test.php`.

## 5. Sensitive Files and Credentials Found

*   **`/etc/shadow`:** Contains hashed passwords for all users on the system. The hash for user `andrey` was extracted: `andrey:$y$j9T$9WBQ0H4N9M0/BG4OjPGZF/$OLzBJRQBeNiqCWIDtWr9abtMkyorDYUrIH5pzG5fqf5`.
*   **`/secrets/passwords.txt`:** Contains plaintext credentials:
    *   `it_admin:C0mplex_77!_HArd_To_Gu3ss`
    *   `ftp_user:123456`
    *   `web_admin:password123`
    *   `guest_user:password123`
    *   `root:password`

## 6. Tools Used

*   `autorecon`: For automated reconnaissance and service enumeration.
*   `nmap`: For detailed port scanning and service version detection.
*   `showmount`: To enumerate NFS exports.
*   `mount`: To mount NFS shares locally.
*   `curl`: For interacting with web services (phpMyAdmin login, web shell execution).
*   `grep`, `sed`: For parsing and extracting information from HTML responses.
*   `netcat`: For setting up a listener for the reverse shell.
*   `cp`: To copy files to the mounted NFS share.
*   `rm`: To remove files.
*   `id`, `hostname`, `cat /etc/os-release`, `cat /etc/shadow`: Standard Linux commands for post-exploitation information gathering.
*   `john`, `hashcat`: Attempted for offline password cracking (unsuccessful in this instance due to hash format issues).

## 7. Conclusion

The penetration test successfully demonstrated critical vulnerabilities on the target machine, leading to full root compromise. The misconfigured NFS shares and exposed plaintext credentials were the primary vectors. Addressing these vulnerabilities immediately is crucial to prevent unauthorized access and maintain the security of the system.

## 8. Recommendations

### 8.1. Immediate Action: Secure NFS Shares
*   **Recommendation:** Restrict NFS exports to only trusted IP addresses or networks. Implement `no_root_squash` with extreme caution, or ideally, avoid it entirely. Review `/etc/exports` on the target system and ensure only necessary directories are shared with appropriate permissions.

### 8.2. Immediate Action: Remove Exposed Credentials
*   **Recommendation:** Immediately remove `passwords.txt` from the `/secrets` directory. Implement a robust secrets management solution. All passwords found in `passwords.txt` should be changed immediately, especially the `root` password.

### 8.3. Immediate Action: Secure phpMyAdmin
*   **Recommendation:**
    *   Change the `root` password for MySQL to a strong, unique password.
    *   Consider restricting access to phpMyAdmin to internal networks or specific IP addresses.
    *   Implement two-factor authentication if available.
    *   Ensure phpMyAdmin is always up-to-date to patch known vulnerabilities.

### 8.4. General Security Best Practices
*   **Recommendation:**
    *   Implement strong, unique passwords for all user accounts.
    *   Regularly patch and update all operating system components and installed software.
    *   Disable unnecessary services.
    *   Implement a firewall to restrict inbound and outbound traffic to only necessary ports.
    *   Conduct regular security audits and penetration tests.
    *   Implement intrusion detection/prevention systems (IDS/IPS).
    *   Monitor system logs for suspicious activity.

This concludes the penetration test report.
- Vulnerable Apps : DVWA for web vulns (SQLi, CSRF, etc.).
This lab is ideal for tools like Metasploit, enum4linux, nfs-common. Use only in isolated VMs for ethical learning.
Known Limitations
- Results are specific to the lab configuration used; outcomes will differ on hardened or patched targets.
- AI tool selection is heuristic — novel service configurations may require re-prompting or manual follow-up.
- All walkthroughs ran in an isolated VirtualBox/VMware network, not a production environment.
- Timing and success rates vary with host CPU, RAM, and network latency.
- Some tool outputs are truncated in the screenshots; full output was reviewed live during the session.
By Andrey Pautov on January 6, 2026.
Exported from Medium on May 15, 2026.